


 Electrical System Workshop Manual-1")
 Electrical System Workshop Manual-2")
 Electrical System Workshop Manual-3")
 Electrical System Workshop Manual-4")
VW Polo (AW/BZ) Electrical System Workshop Manual with high-quality graphics and illustrations.
Format: PDF
Pages: 242
Delivery: The download link will instantly be sent to your email after checkout.
Covered VW Vehicles
- Polo 2018 ➤
Repair Group:
- Technical data
- Starter, current supply, CCS
- Gauges, instruments
- Windscreen wash/wipe system
- Lights, bulbs, switches – exterior
- Lights, bulbs, switches – interior
- Wiring
Contents:
- Technical data
- Safety information
- Safety measures when working on vehicles with a start/stop system
- Safety precautions when using test and measuring equipment during a road test
- Repair notes
- Rules for cleanliness
- General information
- Contact corrosion
- Routing and attachment of lines
- Battery
- Battery – general notes
- Types of battery
- Starter, current supply, CCS
- Battery
- Assembly overview – battery
- Removing and installing battery
- Disconnecting and connecting battery
- Removing and installing battery tray
- Checking battery
- Charging battery
- Removing and installing earth wire with battery monitor control unit J367
- Adapting battery monitor control unit J367
- Jump start point
- Assembly overview – jump-start terminal
- Removing and installing jump starting point
- Alternator
- Assembly overview – alternator
- Removing and installing alternator
- Checking alternator
- Removing and installing poly V-belt pulley
- Removing and installing voltage regulator
- Starter motor
- Assembly overview – starter
- Removing and installing starter motor
- Checking starter
- Cruise control system (CCS)
- Start/stop system
- General description – start/stop system
- Adaptive cruise control
- Overview of fitting locations – adaptive cruise control
- Removing and installing automatic distance control unit
- Calibrating adaptive cruise control
- Gauges, instruments
- Dash panel insert
- Assembly overview – dash panel insert
- Removing and installing dash panel insert KX2
- Horn
- Assembly overview – horn
- Removing and installing treble horn H2 and bass horn H7
- Windscreen wash/wipe system
- windscreen wiper system
- Assembly overview – windscreen wiper system
- Moving wipers to service position
- Removing and installing wiper blade
- Removing and installing wiper arms
- Adjusting wiper arms
- Removing and installing wiper motor V
- Removing and installing rain and light sensor
- Windscreen washer system
- Assembly overview – windscreen washer system
- Removing and installing filler neck of washer fluid reservoir
- Removing and installing washer fluid reservoir
- Removing and installing windscreen washer fluid level sender
- Removing and installing windscreen washer pump
- Removing and installing washer jets
- Adjusting spray jets
- Rear window wiper system
- Assembly overview – rear window wiper system
- Removing and installing wiper blade
- Removing and installing wiper arm
- Adjusting wiper arm
- Removing and installing rear window wiper motor V12
- Rear window washer system
- Assembly overview – rear window washer system
- Removing and installing washer fluid reservoir
- Removing and installing rear window washer pump
- Removing and installing washer jet
- Adjusting spray jet
- Washer fluid lines
- Repairing washer fluid lines
- Lights, bulbs, switches – exterior
- Headlights
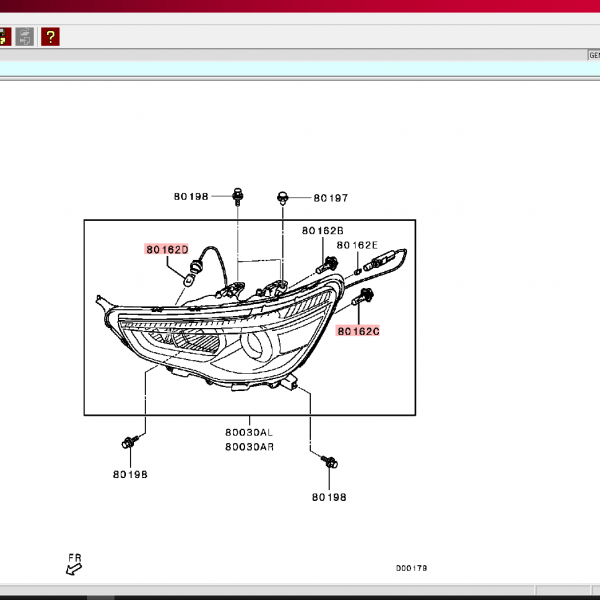
- Assembly overview – headlight
- Removing and installing headlight
- Adjusting headlights
- Adjusting headlight installation position
- Removing and installing front turn signal bulb M5 / M7
- Installing repair kit for headlight housing
- Converting headlights from driving on right to driving on left
- Converting headlights from driving on left to driving on right
- Removing and installing headlight range control motor V48 / V49
- Removing and installing dipped beam bulb
- Removing and installing headlight main beam bulb M30 / M32
- Removing and installing daytime running light
- Removing and installing bulbs for cornering light L148 / L149
- Removing and installing output module 1 for LED headlight A31 / A27
- Fog lights
- Assembly overview – fog lights
- Removing and installing fog light
- Removing and installing fog light bulb L22 / L23
- Adjusting fog lights
- Lights in exterior mirror
- Assembly overview – lights in exterior mirror
- Removing and installing turn signal
- Tail lights
- Assembly overview – tail lights in body
- Removing and installing bulb carrier
- Removing and installing tail light cluster
- Adjusting installation position of tail light
- Removing and installing tail light bulb M2 / M4
- Removing and installing rear fog light bulb L46 / L47
- Removing and installing brake and tail light bulb M21 / M22
- Removing and installing reversing light bulb
- Removing and installing turn signal bulb
- High-level brake light
- Assembly overview – high-level brake light
- Removing and installing high-level brake light
- Number plate light
- Removing and installing number plate light X4 / X5
- Removing and installing bulb for number plate light X4 / X5
- Entry and start authorisation system
- Overview of fitting locations – entry and start authorisation system
- Overview of fitting locations – keyless entry system
- Removing and installing interface for entry and start system J965
- Removing and installing contact sensor for front left exterior door handle G605 / G606
- Removing and installing interior aerial 1 for entry and start system R138
- Removing and installing interior aerial 2 for entry and start system R139
- Removing and installing left entry and start authorisation aerial R200
- Removing and installing right entry and start authorisation aerial R201
- Removing and installing rear bumper aerial for entry and start system R136
- Steering column switch module
- Assembly overview – steering column switch module
- Removing and installing lock cylinder
- Removing and installing ignition key withdrawal lock solenoid N376
- Removing and installing ignition/starter switch
- Removing and installing steering column switch module
- Removing and installing steering column electronics control unit J527
- Removing and installing turn signal switch E2
- Removing and installing cruise control system switch E45
- Removing and installing intermittent wiper switch E22
- Removing and installing base for steering column combination switch
- Removing and installing steering lock housing
- Parking aid
- Assembly overview – parking aid
- Removing and installing parking aid control unit J446
- Removing and installing front parking aid warning buzzer H22
- Removing and installing rear parking aid warning buzzer H15
- Removing and installing front parking aid senders
- Removing and installing rear parking aid senders
- Park assist steering
- Assembly overview – park assist steering
- Removing and installing park assist steering control unit J791
- Removing and installing front senders
- Removing and installing rear senders
- Automatic headlight range control
- Assembly overview – automatic headlight range control
- Removing and installing headlight range control unit
- Blind Spot Monitor
- Assembly overview – blind spot monitor
- Removing and installing blind spot monitor warning lamp in exterior mirror K303 / K304
- Removing and installing blind spot monitor control unit J1086 / J1087
- Lights, bulbs, switches – interior
- Lights
- Overview of fitting locations – lights in dash panel
- Overview of fitting locations – lights in front doors
- Overview of fitting locations – lights in centre console
- Overview of fitting locations – lights in luggage compartment
- Overview of fitting locations – lights in roof trim
- Removing and installing front footwell light K268 / K269
- Removing and installing bulb for front footwell light L151 / L152
- Removing and installing Central locking SAFELOCK function warning lamp K133
- Removing and installing storage compartment illumination bulb L120
- Removing and installing interior door handle illumination bulb L146 / L147
- Removing and installing bulb for background lighting in front door L164 / L165
- Removing and installing light for left dashboard ambient lighting L229
- Removing and installing light for right dashboard ambient lighting L230
- Removing and installing light for centre dashboard ambient lighting L231
- Removing and installing selector lever position display Y26
- Removing and installing luggage compartment light W3
- Removing and installing bulb for luggage compartment light W3
- Removing and installing illuminated vanity mirror W20 / W14
- Renewing front interior light bulb W1 / W13 / W19
- Renewing bulb for rear interior light W43
- Removing and installing bulb for rear reading light W11 / W12
- Controls
- Overview of fitting locations – controls in dash panel
- Overview of fitting locations – controls in front doors
- Overview of fitting locations – controls in rear doors
- Overview of fitting locations – controls in centre console
- Overview of fitting locations – controls in luggage compartment
- Overview of fitting locations – controls in roof trim
- Removing and installing rotary light switch EX1
- Removing and installing headlight range control regulator E102
- Removing and installing TCS and ESP button E256
- Removing and installing parking aid button E266
- Removing and installing park assist steering button E581
- Removing and installing Start/Stop operation button E693
- Removing and installing button for Charisma E735
- Removing and installing front passenger side airbag deactivated warning lamp K145
- Removing and installing switch module in centre console
- Removing and installing hazard warning light switch EX3
- Removing and installing buttons for seat heating E653 / E654
- Removing and installing exterior mirror adjuster EX11
- Removing and installing operating unit for window regulator in driver door E512
- Removing and installing window regulator switch in front passenger door EX27
- Removing and installing driver side interior locking button for central locking system E308
- Removing and installing door contact switch F2 / F3
- Removing and installing rear window regulator switch in door E52 / E54
- Removing and installing rear door contact switches F10 / F11
- Removing and installing the starter button E378
- Removing and installing rear lid contact switch
- Removing and installing vanity mirror contact switch F147 / F148
- Removing and installing sunroof button E325
- Removing and installing front interior light/reading light
- Removing and installing rear interior light/reading light
- Anti-theft alarm
- Assembly overview – interior monitor
- Removing and installing alarm horn H12
- Removing and installing anti-theft alarm sensor G578
- Immobiliser
- Removing and installing immobiliser control unit
- Removing and installing immobiliser reader coil
- Towing bracket
- Assembly overview – socket, trailer detector control unit
- Trailer socket
- Removing and installing trailer detector control unit J345
- Cigarette lighter, socket
- Removing and installing cigarette lighter U1
- Removing and installing socket illumination bulb L42
- Removing and installing rear cigarette lighter illumination bulb L32
- Removing and installing electric socket U
- Wiring
- Relay carriers, fuse holders, electronics boxes
- Overview of fitting locations – relay carriers, fuse holders, E-boxes
- Assembly overview – fuse holder A SA
- Assembly overview – main fuse carrier
- Removing and installing electronics box (E-box)
- Removing and installing relay and fuse holder in electronics box
- Removing and installing relay and fuse holder behind dash panel on driver side
- Removing and installing fuse holder A SA
- Removing and installing main fuse carrier
- Select Control units
- Overview of fitting locations – control units
- Removing and installing onboard supply control unit J519
- Removing and installing data bus diagnostic interface J533
- Removing and installing bracket for onboard supply control unit J519
- Removing and installing parking aid control unit J446 / park assist steering control unit J791
- Connectors
- Repairing electrical wiring harnesses and plug-in connections
- Releasing and dismantling connector housings
- Repairing aerial wires
- Fibre optic cables
- Vehicle diagnosis, testing and information systems


Reviews
Clear filtersThere are no reviews yet.